In this post, I’ll cover how to build a WordPress plugin from scratch. The goal is to get you started with WordPress plugin development and not to build anything complex yet 😉
Some of you may ask, what’s the point in creating a new plugin? Why not just use other plugins out there?
It’s because sometimes the plugin does not fulfill our requirements. Or we need some kind of customization. Sometimes the plugin is too bloated with useless dependencies or is full of security vulnerabilities.
Whatever it is, plugin development can give you a good deep dive into the core functionalities in WordPress and enable you to do more powerful customization.
We’ll cover the following implementations for this plugin:
- Add an entry to the list of installed plugins and customize the description and author
- Add a menu item in the admin menu
- Add a new plugin admin page with a text field
- Add a shortcode hook and return the text field value on a public page
Let’s start!
If you haven’t set up a dev environment yet, you can follow my previous post.
First, create a new directory for your plugin, the name of the directory should be the name of your plugin too. I’ll put very-simple-plugin.
Create a new PHP file in that folder and name it the same as the directory:
very-simple-plugin.php
In the PHP file, you can specify the name of your plugin and put up a description in the header using comments. Here are some of the fields you can use to give more information about your plugin:
- Plugin Name: Name of your plugin
- Description: Describe what your plugin does
- Author: Put your name down and hopefully when your plugin goes viral, you will be famous
Save the file.
That’s it!

Now you have your very own WordPress plugin installed! Let’s move on with life. Okay kidding. It’s still far from complete.
The very first line you should be putting in is this:
if (!defined('WPINC')) {
  die;
}
From my understanding, this prevents your plugin file being called directly. What this means is if you have other PHP scripts outside of WordPress, maybe on a different folder on the same server, that PHP script can just import your plugin file and call its functions. An attacker can call your plugin and do nasty things to your website through it.
In WordPress, there is the concept of Hooks. Hooks are pieces of code that enable plugins or themes to interact with the WordPress Core. To use the hooks, you will have to provide Callback functions. These callback functions are called when the hook is activated.
There are two types of hooks: Action and Filters.
Actions enable you to add data or modify how WordPress behaves. You can write data into your own database, update settings, display a different page, or call a third party API. It does not require you to return any data back.
Filters on the other hand modifies data in the process. For example, you can change the content of your WordPress post, adding text or removing text. However, you should not modify any data out of the scope of the process, no modifying of global variables and such. Filters expect data returned in the callback function.
I guarantee you will get familiar with these two items the more you work on your WordPress plugin.
Now that you have some understanding of hooks, let’s add an item into the admin menu.
To do this, you can use the admin_menu hook. This hook is activated when the admin menu is loaded into the admin pages. As I mentioned, you need a callback function so let’s go ahead and create that. Then link it up with the hook.
function vsp_setup_admin_menu() {
  echo "Hello";
}

add_action('admin_menu', 'vsp_setup_admin_menu');
This code doesn’t do anything yet, to add a new menu item, this function is used: add_menu_page. It adds a new top-level menu item in the admin menu. You’ll need another function to print out the actual admin page for the plugin.
define('PLUGIN_TITLE', 'Very Simple Plugin');

function vsp_setup_admin_page() {
  echo "<p>Welcome to my very simple plugin!</p>";
}

function vsp_setup_admin_menu() {
  add_menu_page(PLUGIN_TITLE, PLUGIN_TITLE, 'manage_options', 'vsp_admin_page', 'vsp_setup_admin_page');
}
The first argument sets the title of the page. Second argument sets the label on the menu item. The third one shows or hides this menu item based on the user’s capability. Here’s a long list of capabilities in WordPress. The fourth one is for the menu’s slug and the last one points to the callback function that prints the page.
Notice I also prefix my function names with vsp_. This is to prevent naming collisions with other plugins. When we extend our plugins, even more, it’ll be hard to keep track of all the function names so we’ll tap into PHP classes when that comes.
Now you should be able to see a new menu item. Click on it and you will go to your page.
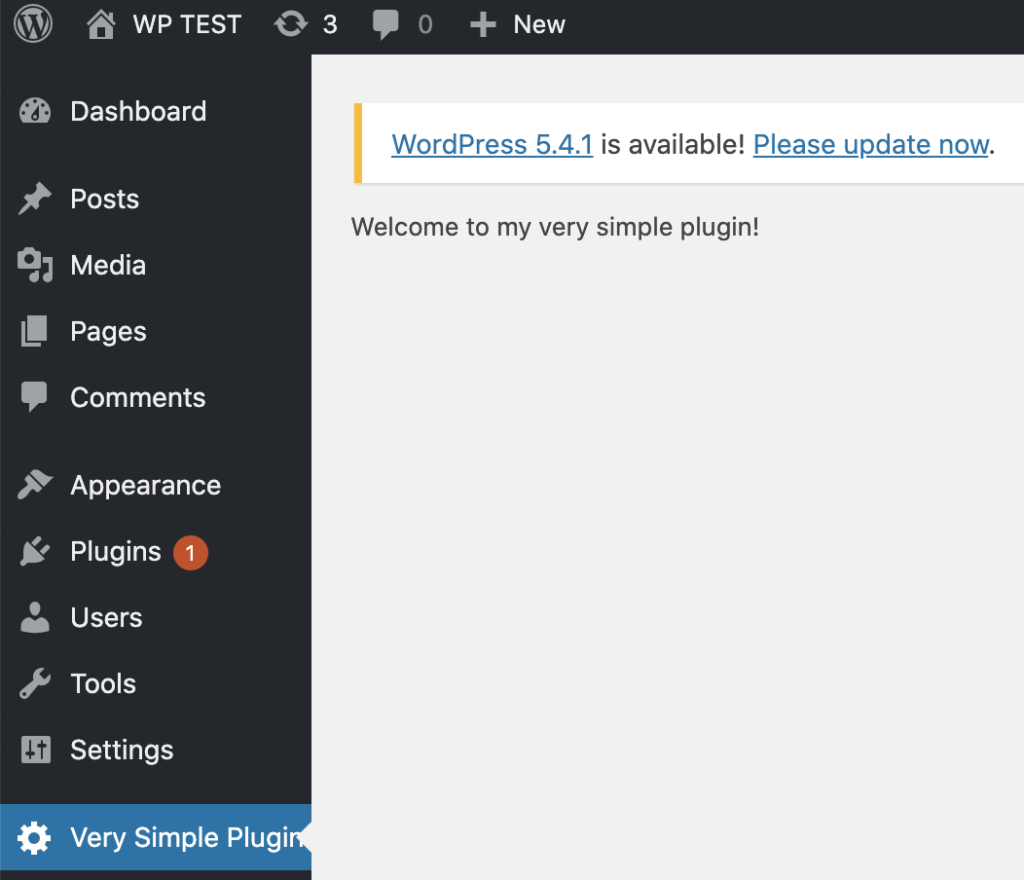
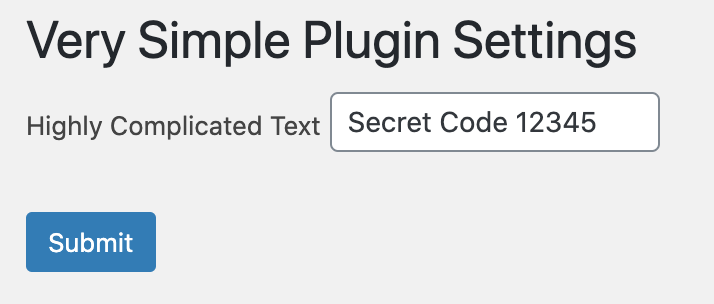
Great work so far! Now let’s make the page a little more sexy and add a form to it. We can create a new template file and import it later on. Let’s create a new folder call views and put our template inside: admin-settings.php.
We’ll build a form to set a textfield. The value will be shown on our public page later.
<h1>Very Simple Plugin Settings</h1>

<form id="vsp_settings_form" method="POST" action="<?= esc_url(admin_url('admin-post.php')); ?>">
  <input type="hidden" name="action" value="vsp_update_option">
  <label for="vsp_text_value">Highly Complicated Text</label>
  <input type="text" name="vsp_text_value" id="vsp_text_value">
  <?= submit_button("Submit") ?>
</form>
You’ll notice we are posting to a page called admin-post.php. This is one of WordPress’s generic request handler used for handling our form submissions. There’s another one called admin-ajax.php but let’s not go into that for now. The admin_url functions print out the URL of the admin page so you don’t need to hardcode the absolute URL to your admin page. The submit_button function, like its name, suggests, prints out a Submit button.
We’ve also added a hidden input that holds the value of action. This value will be used to trigger a hook. In this case it will trigger the admin_post_vsp_update_option hook. This is for authenticated admin requests, there’s one for unauthenticated requests but let’s also skip that for now.
Go ahead and create one callback to handle this hook.
function vsp_handle_update_option() {
  var_dump($_POST['vsp_text_value']);
}

add_action('admin_post_vsp_update_option', 'vsp_handle_update_option');
When you submit the form, you should be seeing the value and its type.
Congratulations you are almost there!
To store the value, we can use the WordPress Options API. It offers a standardized way for us to store data into our WordPress database. It’s intended to store settings for your plugin but let’s just use it to display stuff on the public page anyway.
WordPress also offers sanitizing functions so do use them as well.
define('PLUGIN_TEXT_OPTION', 'vsp_plugin_text_option');

function vsp_handle_update_option() {
  $value = sanitize_text_field($_POST['vsp_text_value']);
  update_option(PLUGIN_TEXT_OPTION, $value);
}
You’ll still get a blank page after this. Fret not, your plugin is still working and your value has been stored in an option. However, after handling the request, you need to tell WordPress you to redirect to a new page. We’ll redirect back to the same page.
function vsp_handle_update_option() {
  $value = sanitize_text_field($_POST['vsp_text_value']);
  update_option(PLUGIN_TEXT_OPTION, $value);
  wp_safe_redirect(
    add_query_arg(array(
      'page' => 'vsp_admin_page' // same as the menu slug you've set just now
    ), admin_url('admin.php'))
  );
}
We are using 2 new functions here: wp_safe_redirect and add_query_arg. The first one redirects the user to a URL while the second one adds query parameters into that URL. Did you notice when you clicked into your admin settings page, it was showing admin.php?page=vsp_admin_page? Yup so let’s go back to that page with the same URL parameters.
Now after hitting the form, you will be redirected to the same page. It feels awkward in the sense that it doesn’t provide any feedback to our inputs. We can use admin notices for this.
function vsp_admin_notice() {
  if (!isset($_GET['success'])) {
    return;
  }

  if ($_GET['success'] === 'false') {
    echo '<div class="notice notice-error"><p>Something went wrong</p></div>';
    return;
  }
  echo '<div class="notice notice-success"><p>Successfully updated settings!</p></div>';
  return;
}

add_action('admin_notices', 'vsp_admin_notice');
The presence of the admin notice is dependent on the success query parameter. So let’s add that into our redirect function.
function vsp_handle_update_option() {
  try {
    $value = sanitize_text_field($_POST['vsp_text_value']);
    update_option(PLUGIN_TEXT_OPTION, $value);
    wp_safe_redirect(
      add_query_arg(array(
        'page' => 'vsp_admin_page',
        'success' => true,
      ), admin_url('admin.php'))
    );
  } catch (Exception $e) {
    wp_safe_redirect(
      add_query_arg(array(
        'page' => 'vsp_admin_page',
        'success' => false
      ), admin_url('admin.php'))
    );
  }
}
The admin page is pretty much done, for now, the security can be improved but we’ll come back to it again.
Finally it’s time to show our highly complicated text value on to the public facing pages! We can use a shortcode for this. When the shortcode is added to the content, it will fetch the value from the same option we stored our value in and display it.
function vsp_display_option_shortcode() {
  return get_option(PLUGIN_TEXT_OPTION);
}
add_shortcode('vsp_text', 'vsp_display_option_shortcode');
Great! Now we can use the shortcode in any of our pages! Let’s set it on the admin page first.
And put our shortcode on one of our page.
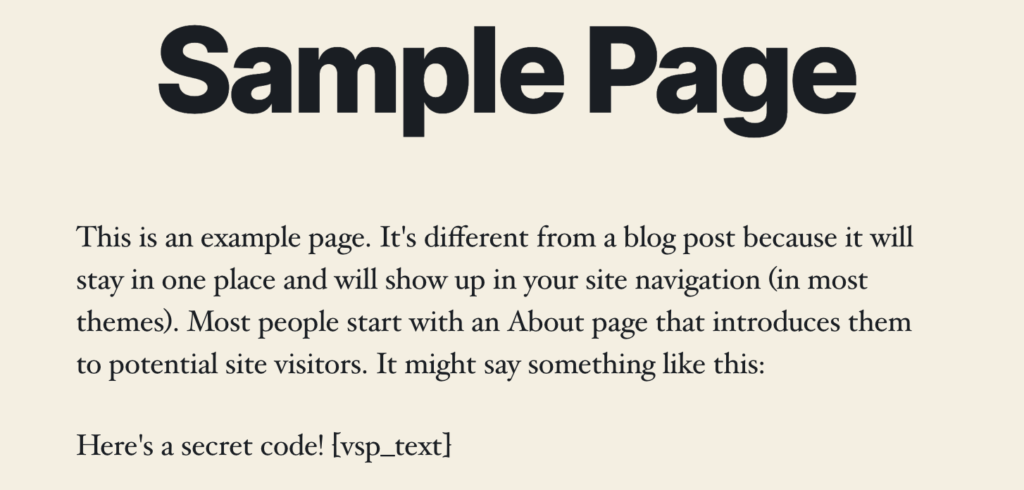
Hit publish.
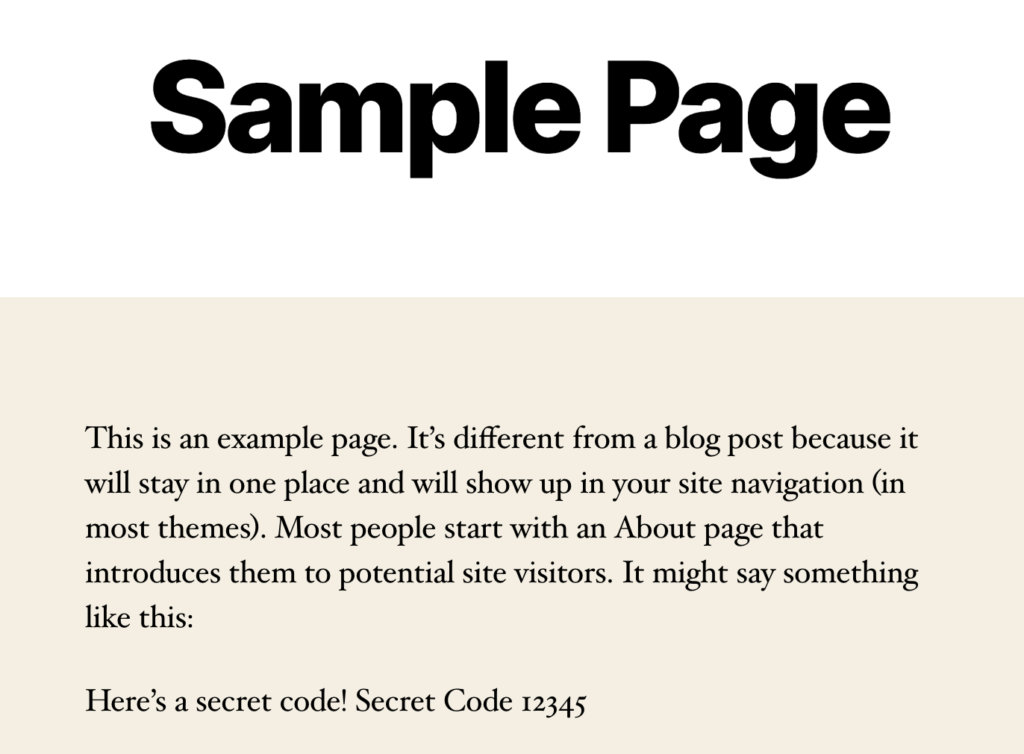
And there you go! Change the value again on Admin and you should be seeing a different value.
That’s it! I hope you’ve picked up the basics of WordPress Plugin Development. Like I mentioned, the goal is not to create a super complicated plugin but to get you started on it. We’ve got some topics to cover like security, creating new tables to store more types of data, CSS styles for the admin page but we’ll leave it for later.
Link to gist: https://gist.github.com/zenvisuals/608baf1f8097455f415f22cbd124e92c
Is there anything I may have missed out over here? Reach out to me in the comments below or contact me directly.
I’ve also started a FB Group to discuss any issues regarding WordPress Dev.